
 SpringMVC-注解开发
这里只提供一些原SpringMVC没有学到的功能
# 学习目标
掌握基于SpringMVC获取请求参数与响应json数据操作
熟练应用基于REST风格的请求路径设置与参数传递
能够根据实际业务建立前后端开发通信协议并进行实现
基于SSM整合技术开发任意业务模板功能
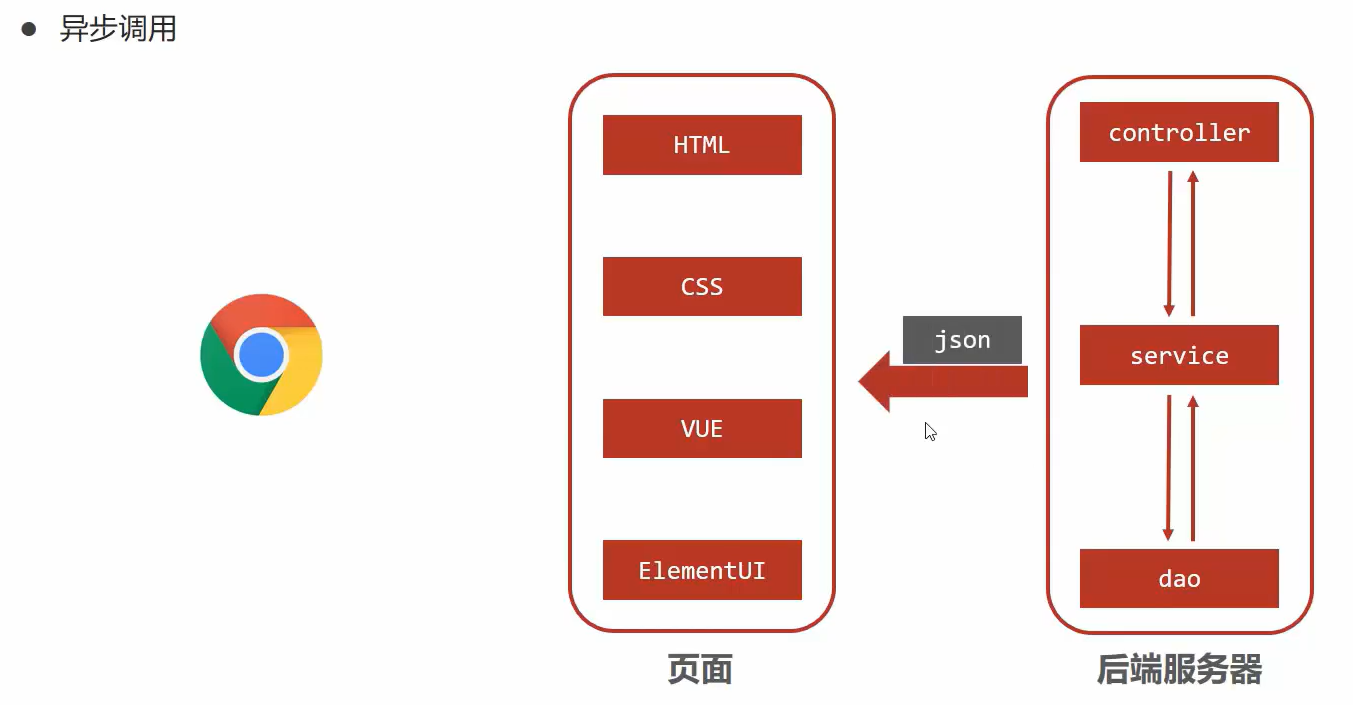
现阶段开发流程
Spring MVC负责实现controller 和json
# 配置转换
# 原始xml文件
# spring-mvc.xml
<!-- s1.Controller 组件扫描-->
<context:component-scan base-package="com.diana.controller"/>


<!-- s2.配置内部资源视图解析器-->                                            <!-- 没有对应的配置类-->
<bean id="viewResolver" class="org.springframework.web.servlet.view.InternalResourceViewResolver">
    <!-- 设置默认前缀和后缀 -->
    <!--        <property name="prefix" value="/jsp/"/>-->
    <property name="prefix" value=""/>
    <property name="suffix" value=".jsp"/>
</bean>


<!-- s4.mvc的注解驱动-->
<mvc:annotation-driven conversion-service="conversionService"/>
<mvc:annotation-driven/>

<!-- s5.1开放资源的访问 (一般是静态资源)-->
<!--    <mvc:resources mapping="/js/**" location="/js/"/>-->
<!--    <mvc:resources mapping="/img/**" location="/img/"/>-->
<!--    <mvc:resources mapping="/html/**" location="/html/"/>-->
<!-- s5.2使用原始tomcat  找静态资源  与上面虽然过程不一样,但是功能一样-->
<mvc:default-servlet-handler/>


<!-- s6.声明转换器-->  <!-- 然后在mvc的注解驱动中声明-->                       <!-- 没有对应的配置类-->
<bean id="conversionService" class="org.springframework.context.support.ConversionServiceFactoryBean">
 <property name="converters">
     <list>
         <bean class="com.diana.converter.DateConverter"/>
     </list>
 </property>
</bean>


   <!-- s7.配置文件上传解析器-->                                                 <!-- 没有对应的配置类-->
   <bean id="multipartResolver" class="org.springframework.web.multipart.commons.CommonsMultipartResolver">
    <property name="defaultEncoding" value="UTF-8"/>
    <property name="maxUploadSize" value="50000"/>  <!-- 上传文件总大小-->
    <property name="maxUploadSizePerFile" value="5000"/>  <!-- 上传文件总大小-->
</bean>


<!-- s8.配置拦截器-->
<mvc:interceptors>
    <!--拦截器1-->
    <mvc:interceptor>
        <!--对哪些资源进行拦截-->
     <mvc:mapping path="/**"/>
     <bean class="com.diana.interceptor.MyInterceptor1"/>
 </mvc:interceptor>
 <!--拦截器2-->
 <mvc:interceptor>
        <!--对哪些资源进行拦截-->
        <mvc:mapping path="/**"/>
        <bean class="com.diana.interceptor.MyInterceptor2"/>
    </mvc:interceptor>
   </mvc:interceptors>


   <!-- s9.1配置简单映射异常处理器-->
   <bean class="org.springframework.web.servlet.handler.SimpleMappingExceptionResolver">
    <!-- 默认错误视图    value 是视图名称(自己随便起名)  省略了前后缀-->
    <property name="defaultErrorView" value="/exception/error"/>
    <!-- 异常错误映射  优先判断里面的异常类型,里面没有时 才会进入默认错误视图-->
 <property name="exceptionMappings">
     <map>
         <entry key="com.diana.exception.MyException" value="/exception/Myerror"/><!-- 自定义异常-->
         <entry key="java.lang.ClassCastException" value="/exception/error_class"/><!-- 类型转换异常-->
     </map>
    </property>
   </bean>
   <!-- s9.2配置自定义异常处理器-->
   <bean class="com.diana.resolver.MyExceptionResolver"/>
# web.xml
<!-- w1.配置全局过滤的filter-->
<filter>
  <filter-name>CharacterEncodingFilter</filter-name>
  <filter-class>org.springframework.web.filter.CharacterEncodingFilter</filter-class>
  <init-param>   <!-- 解决乱码问题  post -->
    <param-name>encoding</param-name>
    <param-value>UTF-8</param-value>
  </init-param>
</filter>
<filter-mapping>
  <filter-name>CharacterEncodingFilter</filter-name>
  <url-pattern>/*</url-pattern>
</filter-mapping>


<!-- w2.配置SpringMVC的前端控制器-->
<servlet>
  <servlet-name>DispatcherServlet</servlet-name>
  <servlet-class>org.springframework.web.servlet.DispatcherServlet</servlet-class>
  <init-param> <!-- 加载spring-mvc 配置文件-->
    <param-name>contextConfigLocation</param-name>
    <param-value>classpath:spring-mvc.xml</param-value>
  </init-param>
  <load-on-startup>1</load-on-startup>
</servlet>
<servlet-mapping>
  <servlet-name>DispatcherServlet</servlet-name>
  <url-pattern>/</url-pattern> <!-- 所有请求都要走 这个-->
</servlet-mapping>


<!-- w3.全局初始化参数   加载Spring配置文件 解耦-->
<context-param>
  <param-name>contextConfigLocation</param-name>
  <param-value>classpath:applicationContext.xml</param-value>
</context-param>


<!--w4.配置监听器  来自动加载Spring应用上下文-->
<listener>
  <listener-class>org.springframework.web.context.ContextLoaderListener</listener-class>
</listener>
# 配置类
# Spring配置类
在该类中要排除对Controller包的扫描,推荐第一种方法
@Configuration

// 精准加载个别包
//@ComponentScan({"com.diana.service","com.diana.mapper"}) //推荐第一种

//扫描所有包,排除controller包
@ComponentScan(value="com.diana",
        excludeFilters = @ComponentScan.Filter(
                type= FilterType.ANNOTATION,  //按注解过滤
                classes = Controller.class    //过滤controller
))

public class SpringConfig {
}
# SpringMVC配置类
//SpringMVC 配置文件

@Configuration
//专门扫描controller包   <!-- s1.Controller 组件扫描-->
@ComponentScan({"com.diana.controller","com.diana.config"})  //要通过扫描的方式加入springMVC支持类

//springmvc 开启注解驱动   <!-- s4.mvc的注解驱动-->
//可以自动加载  处理映射器(requestMappingHandlerMapping),处理适配器(requestMappingHandlerAdapter)
//由json数据转换成对象的功能 在处理适配器中
@EnableWebMvc

public class SpringMvcConfig {
}
# SpringMVC支持类
//springmvc支持类
@Configuration

public class SpringMvcSupport extends WebMvcConfigurationSupport{

    @Autowired
    private ProjectInterceptor projectInterceptor;

    @Autowired
    private ProjectInterceptor2 projectInterceptor2;


    @Override //放行静态资源   <!-- s5.1开放资源的访问 (一般是静态资源)-->
    protected void addResourceHandlers(ResourceHandlerRegistry registry) {
        //当访问/pages/??? 时候, 走/pages目录下的内容
        registry.addResourceHandler("/pages/**").addResourceLocations("/pages/");
        registry.addResourceHandler("/js/**").addResourceLocations("/js/");
        registry.addResourceHandler("/css/**").addResourceLocations("/css/");
        registry.addResourceHandler("/plugins/**").addResourceLocations("/plugins/");
    }


    @Override//添加拦截器链   在前面的先执行    <!-- s8.配置拦截器-->
    protected void addInterceptors(InterceptorRegistry registry) {
        //拦截  /books和/books/*
        //  /books只能拦截 /books  不能拦截/books/1
        registry.addInterceptor(projectInterceptor).addPathPatterns("/books","/books/*");
        registry.addInterceptor(projectInterceptor2).addPathPatterns("/books","/books/*");
    }
}
# web容器启动类
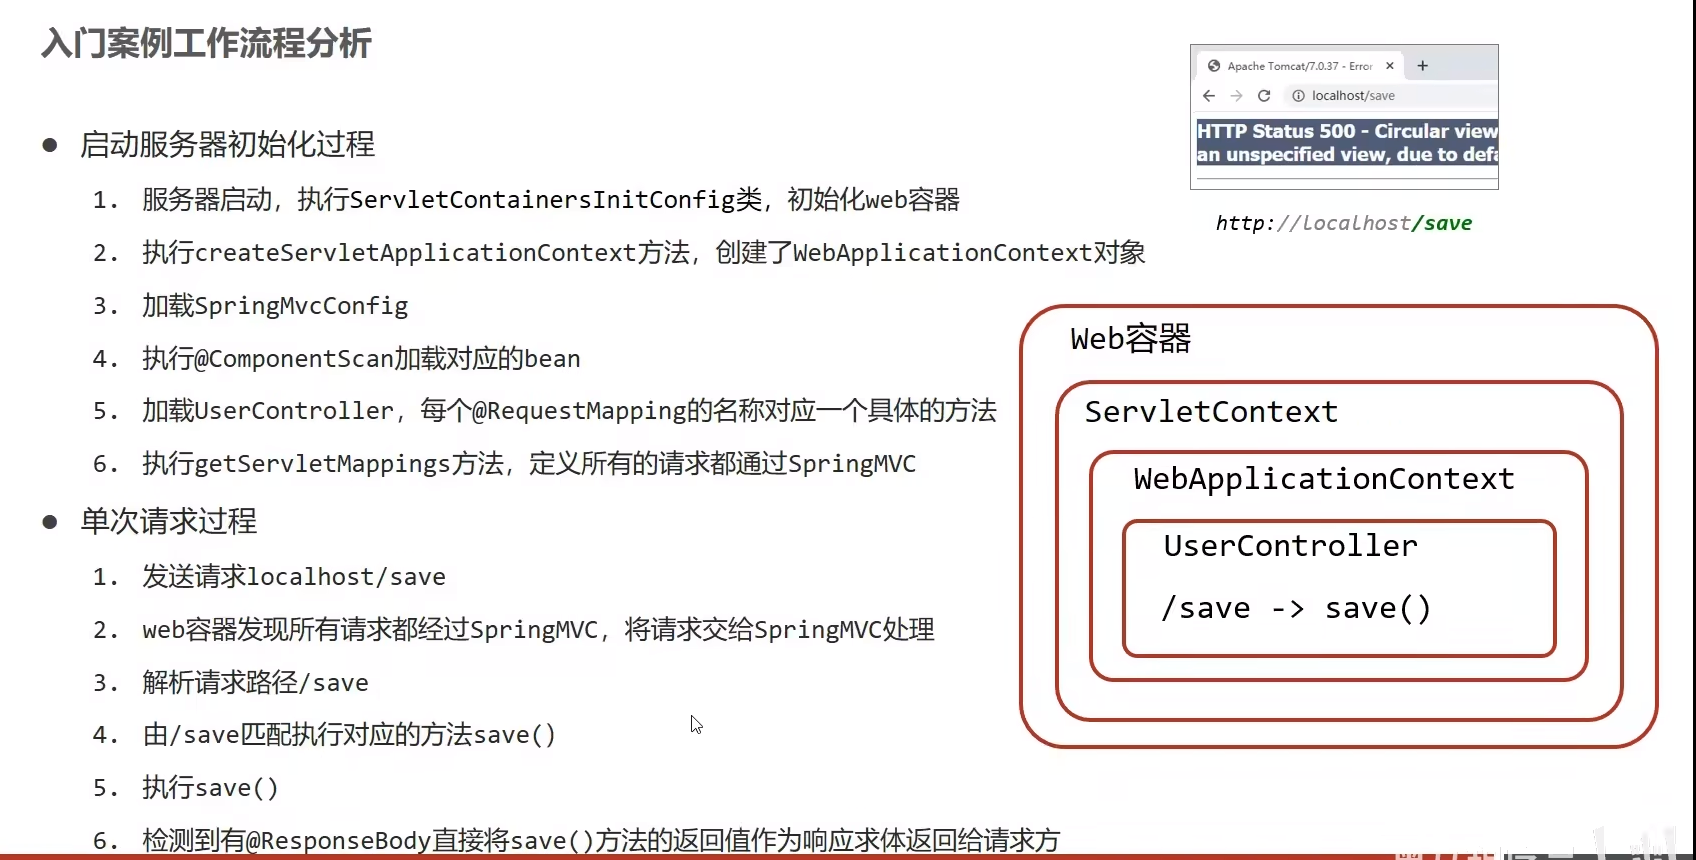
- 原始方法,根源 代码见下方执行流程,及配图
//简化开发
public class ServletContainersInitConfig extends AbstractAnnotationConfigDispatcherServletInitializer{
   //加载spring配置类  <!-- w3.全局初始化参数   加载Spring配置文件 解耦-->   <!--w4.配置监听器  来自动加载Spring应用上下文-->
   protected Class<?>[] getRootConfigClasses() {
       return new Class[]{SpringConfig.class};
   }
   //加载springMVC配置类 <!-- w2.配置SpringMVC的前端控制器——加载springmvc配置文件-->
   protected Class<?>[] getServletConfigClasses() {
       return new Class[]{SpringMvcConfig.class};
   }
   //哪些请求归SpringMVC处理  <!-- w2.配置SpringMVC的前端控制器——设置哪些请求归SpringMVC处理-->
   protected String[] getServletMappings() {
       return new String[]{"/"};
   }

   //全局过滤器  <!-- w1.配置全局过滤的filter-->
   @Override
   protected Filter[] getServletFilters() {
       //乱码处理-- 只能处理post
       CharacterEncodingFilter filter = new CharacterEncodingFilter();
       filter.setEncoding("UTF-8");
       return new Filter[]{filter};
   }

}
# 异常处理类
- 统一异常处理
@RestControllerAdvice //RESTful 异常处理    <!-- s9.2配置自定义异常处理器-->
public class ProjectExceptionAdvice {

    //处理系统异常
    @ExceptionHandler(SystemException.class)
    public Result doSystemException(SystemException ex){
        //记录日志
        //发送特定消息给运维人员,提醒维护
        //发送邮件给开发人员,ex对象发送给开发人员
        //发送固定消息传递给用户,进行安抚
        return new Result(ex.getCode(),null,ex.getMessage()); //这里也返回Result集,保证统一
    }

    //处理业务异常
    @ExceptionHandler(BusinessException.class)
    public Result doBusinessException(BusinessException ex){
        //发送对应消息传递给用户,提醒操作规范
        return new Result(ex.getCode(),null,ex.getMessage()); //这里也返回Result集,保证统一
    }

    //集中的、统一的处理项目中出现的异常
    @ExceptionHandler(Exception.class) //捕获所有异常
    public Result doException(Exception ex){
        //记录日志
        //发送特定消息给运维人员,提醒维护
        //发送邮件给开发人员,ex对象发送给开发人员
        //发送固定消息传递给用户,进行安抚
        return new Result(Code.SYSTEM_UNKNOW_ERR,null,"系统繁忙,请稍后重试"); //这里也返回Result集,保证统一
    }
}
- 自定义异常类
//自定义业务异常

public class BusinessException extends RuntimeException{ //继承运行时异常,这样不用每个方法后面抛异常

    private Integer code;

    public Integer getCode() {
        return code;
    }

    public void setCode(Integer code) {
        this.code = code;
    }

    public BusinessException(Integer code, String message) {
        super(message);
        this.code = code;
    }

    public BusinessException(Integer code, String message, Throwable cause) {
        super(message, cause);
        this.code = code;
    }

    public BusinessException(Integer code) {
        this.code = code;
    }


    public BusinessException(Throwable cause, Integer code) {
        super(cause);
        this.code = code;
    }

    public BusinessException(String message, Throwable cause, boolean enableSuppression, boolean writableStackTrace, Integer code) {
        this.code = code;
    }
}
//自定义系统异常 public class SystemException extends RuntimeException{ //继承运行时异常,这样不用每个方法后面抛异常 private Integer code; public Integer getCode() { return code; } public void setCode(Integer code) { this.code = code; } public SystemException(Integer code, String message) { super(message); this.code = code; } public SystemException(Integer code,String message, Throwable cause) { super(message, cause); this.code = code; } public SystemException(Integer code) { this.code = code; } public SystemException(Throwable cause, Integer code) { super(cause); this.code = code; } public SystemException(String message, Throwable cause, boolean enableSuppression, boolean writableStackTrace, Integer code) { this.code = code; } }
# 拦截器类
# 执行流程
//web容器启动类

//原始方法,根源
public class ServletContainersInitConfig extends AbstractDispatcherServletInitializer {

    //加载SpringMVC容器对象
    protected WebApplicationContext createServletApplicationContext() {
        AnnotationConfigWebApplicationContext ctx = new AnnotationConfigWebApplicationContext();
        ctx.register(SpringMvcConfig.class);
        return  ctx;
    }

    //哪些请求归SpringMVC处理
    protected String[] getServletMappings() {
        return new String[]{"/"}; //所有请求都归springMVC处理
    }

    //记载Spring容器对象
    protected WebApplicationContext createRootApplicationContext() {
        AnnotationConfigWebApplicationContext ctx = new AnnotationConfigWebApplicationContext();
        ctx.register(SpringConfig.class);
        return  ctx;
    }
}
# REST风格
# 1.REST风格简介
http://localhost/users 查询全部用户信息 GET(查询)
http://localhost/users /1 查询指定用户信息 GET(查询)
http://localhost/users 添加用户信息 POST(新增/保存)
http://localhost/users 修改用户信息 PUT(修改/更新)
http://localhost/users /1 删除用户信息 DELETE(删除)
上述行为是约定方式,约定不是规范,可以打破,所以称为REST风格
描述模块的名称通常使用复数,就是加s的格式描述,表示此类资源
根据REST风格对资源进行访问称为RESTful
# 2. 参数获取
json数据——>@RequestBody
//POST提交 --新增数据
@RequestMapping(value = "/users",method = RequestMethod.POST)
@ResponseBody //不进行跳转,return的就是响应体      return 默认的是页面跳转
public String save(@RequestBody User user){ //接收json数据
    System.out.println("user save "+user);
    return "{'info':'save'}";
}
访问url
http://localhost/users请求数据
{ "username":"diana",

  "password":"123"}
输出
user save User{username='diana', password='123', address=null}
请求路径参数——>@PathVariable
- 访问路径后面 用{}包裹参数----参数名要和形参一致
//delete提交 --删除数据
@RequestMapping(value = "/users/{id}",method = RequestMethod.DELETE)
@ResponseBody
public String delete(@PathVariable Integer id){//接收请求路径数据
    System.out.println("user delete id="+id);
    return "{'info':'delete'}";
}
访问url
http://localhost/users/1请求参数
1对应id=1输出
user delete id=1
url地址传参或表单传参 ——>@RequestParam
//集合类型参数1 --参数前加上@RequestParam --集合中存储普通参数 @RequestMapping(value = "/param51") @ResponseBody public void param51(@RequestParam List<String> params) throws IOException {// void 表示响应体为空 // 访问url /param51?params=diana¶ms=凉冰 System.out.println(params);//[diana, 凉冰] }- 访问url
http://localhost//param51?params=diana¶ms=凉冰 - 请求参数
params=diana¶ms=凉冰 - 输出
[diana, 凉冰]
- 访问url
传参方式选取
- 如果请求参数超过1个,以json格式为主,使用@RequestBody
- 采用RESTful进行开发时,当参数较少时,使用@PathVariable
- 如果发送非json数据,选用@RequestParam接收请求数据
# 3.简化开发
----UserController_REST_Simple.java
//REST风格开发
// 简化开发   修改
/*
    1. 提出公共访问路径   在类上面加   @RequestMapping("/users")
    2. 在类上面加 @ResponseBody   表示整个类的所有方法都 不进行页面跳转  将当前返回值作为响应体
    3. 将@Controller  @ResponseBody   合二为一  @RestController
	4. 将@RequestMapping(method = RequestMethod.GET)  替换为对应的    @GetMapping

 */
@RestController  //合二为一版
@RequestMapping("/userss")
public class UserController_REST_Simple {

    @PostMapping
    public String save(@RequestBody User user){ //接收json数据
        System.out.println("user save "+user);
        return "{'info':'save'}";
    }

    @DeleteMapping("/{id}")
    public String delete(@PathVariable Integer id){//接收请求路径数据
        System.out.println("user delete id="+id);
        return "{'info':'delete'}";
    }

    @PutMapping
    public String update(@RequestBody User user){ //接收json数据
        System.out.println("user update "+user);
        return "{'info':'springmvc'}";
    }


    @GetMapping("/{id}")
    public String getById(@PathVariable Integer id){//接收请求路径数据
        // 1.@PathVariable 来自路径
        //2. /users/{id} =====int id    两个名字对应起来

        System.out.println("user getById");
        System.out.println(id);
        return "{'info':'getById'}";
    }


    @GetMapping
    public String getAll(){ //接收请求路径数据
        System.out.println("user getAll");
        return "{'info':'getAll'}";
    }

}
# 4.案例
基于RESTful页面数据交互
配置SpringMvcSupport支持类,放行静态资源
回顾ajax请求写法
//古老写法
var _this=this;
axios({
    "method":"GET",
    "url":"/books"
}).then(function (resp){
    _this.dataList=resp.data;
});
//中间写法 ------暂时推荐这种 使用箭头的方式,可以自动识别this,不用var _this=this axios({ "method":"GET", "url":"/books" }).then((res)=>{ this.dataList=res.data; });//最简单写法 --------等写熟了,推荐这种 axios.get("/books").then((res)=>{ this.dataList = res.data; });
# POSTMAN
功能解析
- 右键点击集合,选择
add Folder,新建文件夹,存放一个集合下的一个整体请求快捷键
- ctrl,+ 放大页面; ctrl,— 缩小页面
路径请求
- get请求参数在
Params- post请求在
Body
- 表单 ----
x-www-form-urlencoded- 数据----
raw
- json ---
JSON- PUT请求
- DELETE请求