 原理篇
原理篇
# 原理篇
# 学习目标
- 掌握SpringBoot内部工作流程
- 理解SpringBoot整合第三方技术的原理
- 实现自定义开发整合第三方技术的组件
# 自动配置
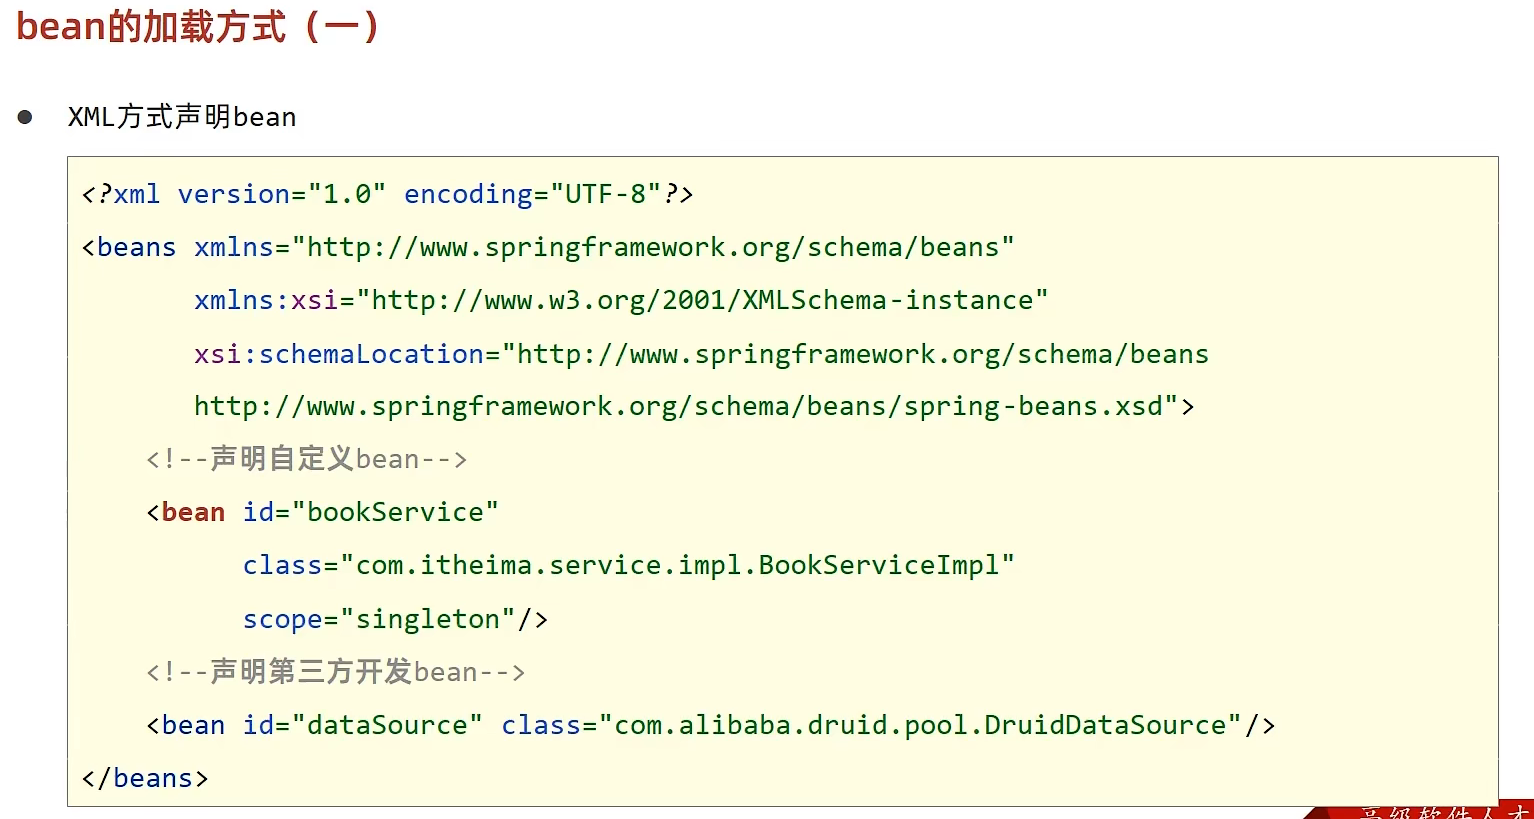
# bean 加载方式
1.2
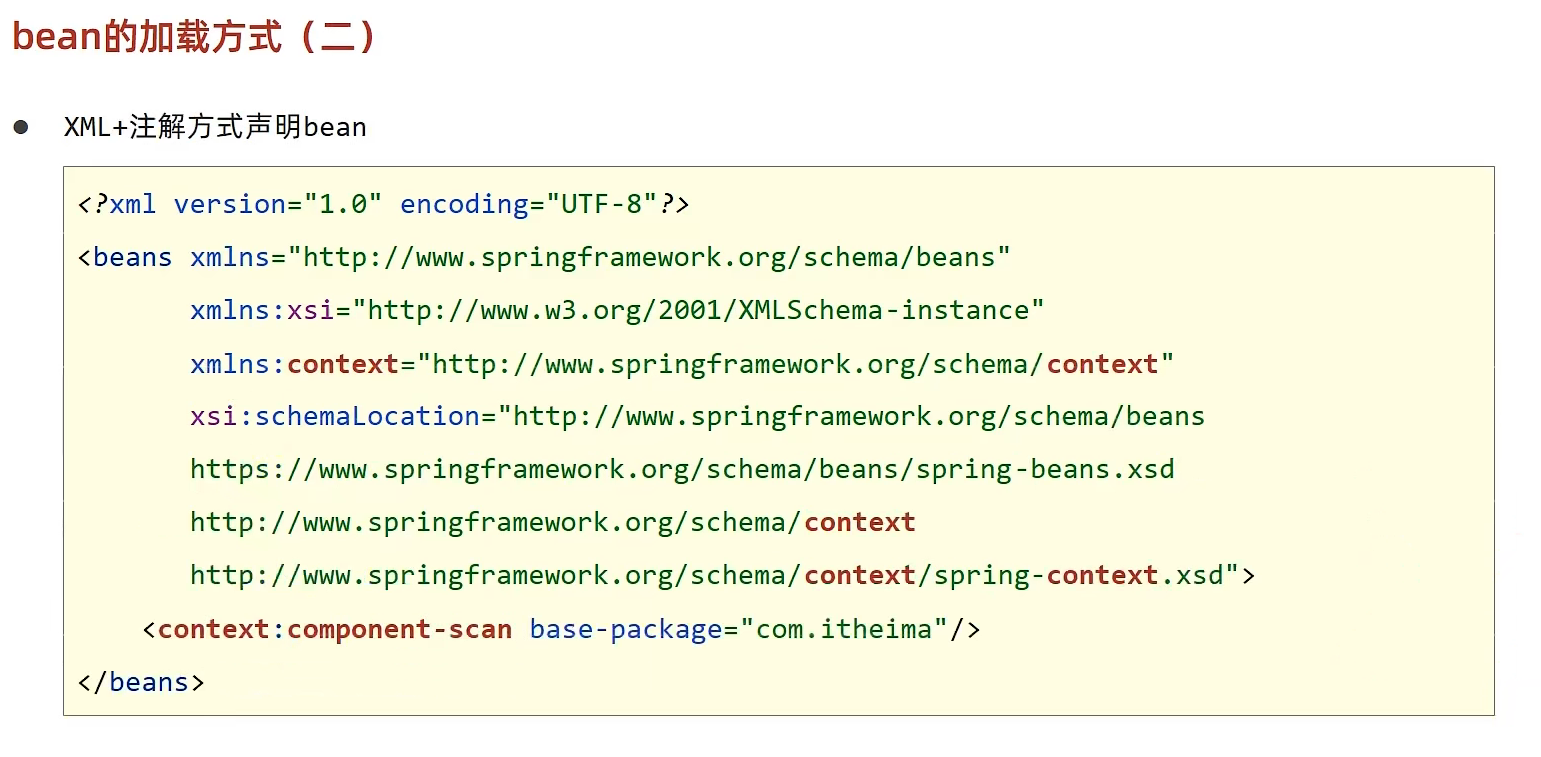
3.从spring配置中调用方法,创建对象
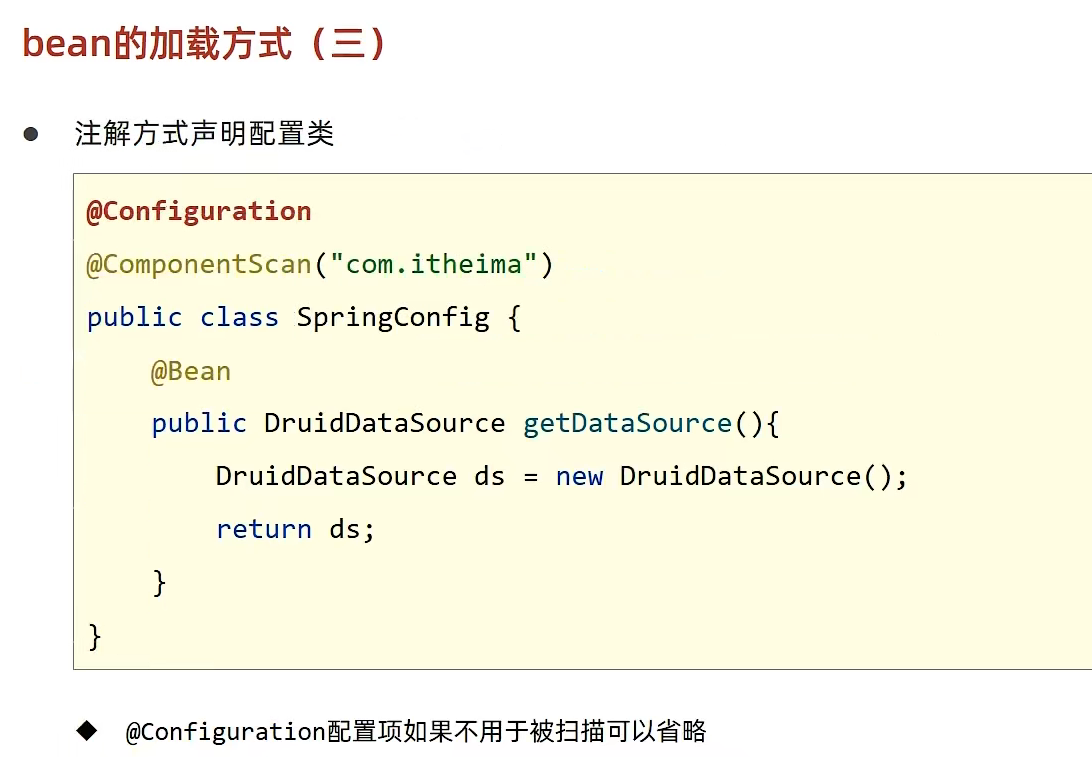
- 默认配置时true,保证每次从配置类中执行方法时,操作的都是一个对象,直接从容器拿对象,而不会创建新的对象
- 若配置为false,则每次执行方法,都会创建一个新的对象
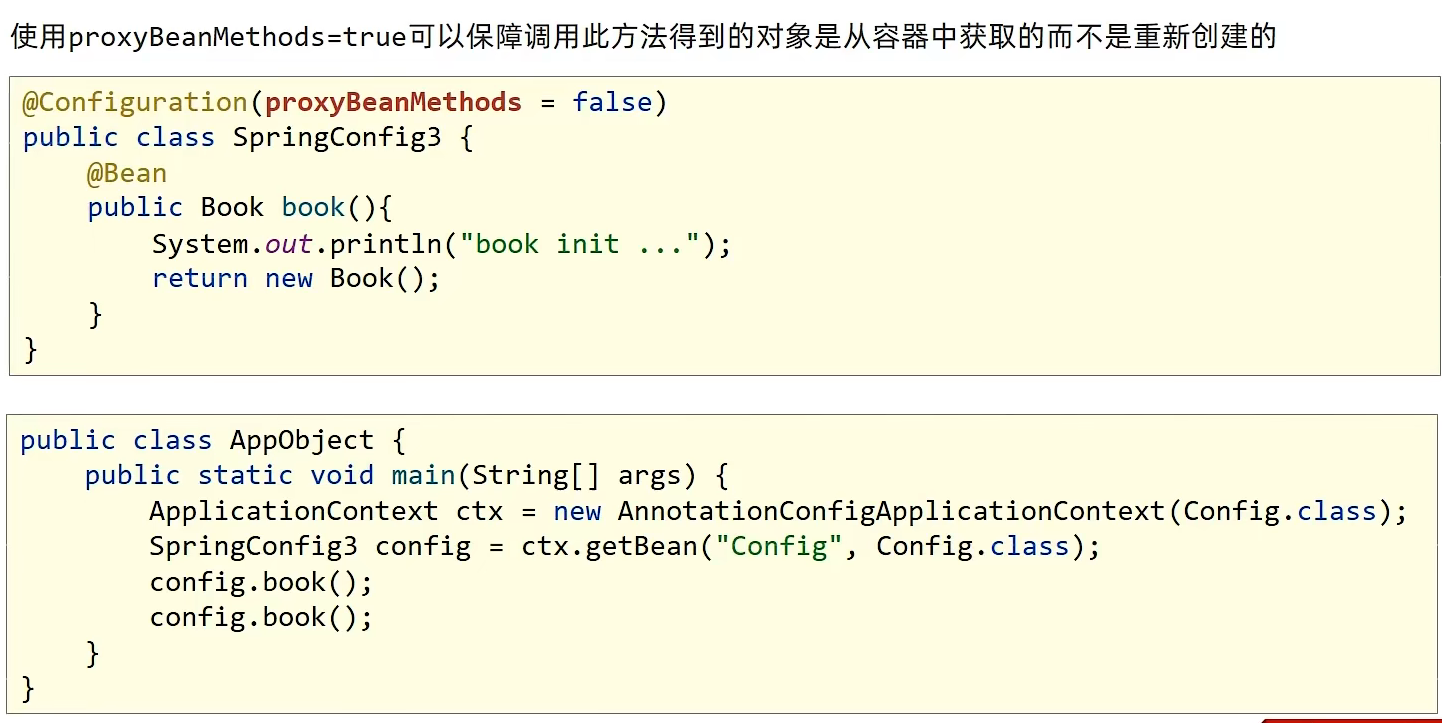
4.1在spring配置类中加载原xml配置的东西
@ImportResource({"applicationContext-account.xml","applicationContext-account_ZJ.xml"})//导入配置文件的信息- 当导入多个配置时,若有同名bean,加载哪个?
- xml优先级高于配置类,不管谁在前,永远加载xml
- 同级别配置,后加载的覆盖先加载的 前面使用c3p0 数据源,后面使用druid数据源——>druid 数据源生效
@Test//测试从不同的地方加载两个同名bean,哪个bean生效
//两个dataSource 同名,一个c3p的,一个durid的
//1.以xml配置文件加载的bean优先
//2.同级别配置,后加载的覆盖先加载的
//前面使用c3p0 数据源,后面使用druid数据源——>druid 数据源生效
public void test_bean(){
    AnnotationConfigApplicationContext app = new AnnotationConfigApplicationContext(SpringConfiguration.class);
    Object dataSource = app.getBean("dataSource");
    System.out.println(dataSource);

}
4.2使用
@Import({aaa.class})导入类- 导入普通类,会以全路径名称的方式导入类——
com.diana.pojo.DataSource - 导入配置类,不仅会以全路径名称的方式导入配置类,还会将类中的
@Bean定义的bean加载。- 且被加载的配置类,头上可以不用挂
@Configuration
- 且被加载的配置类,头上可以不用挂
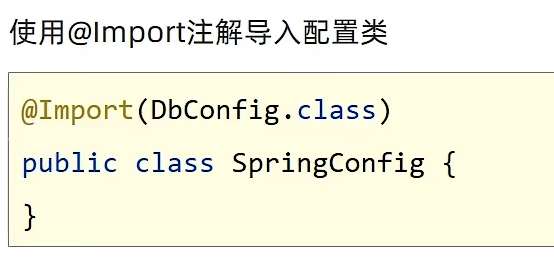
- 导入普通类,会以全路径名称的方式导入类——
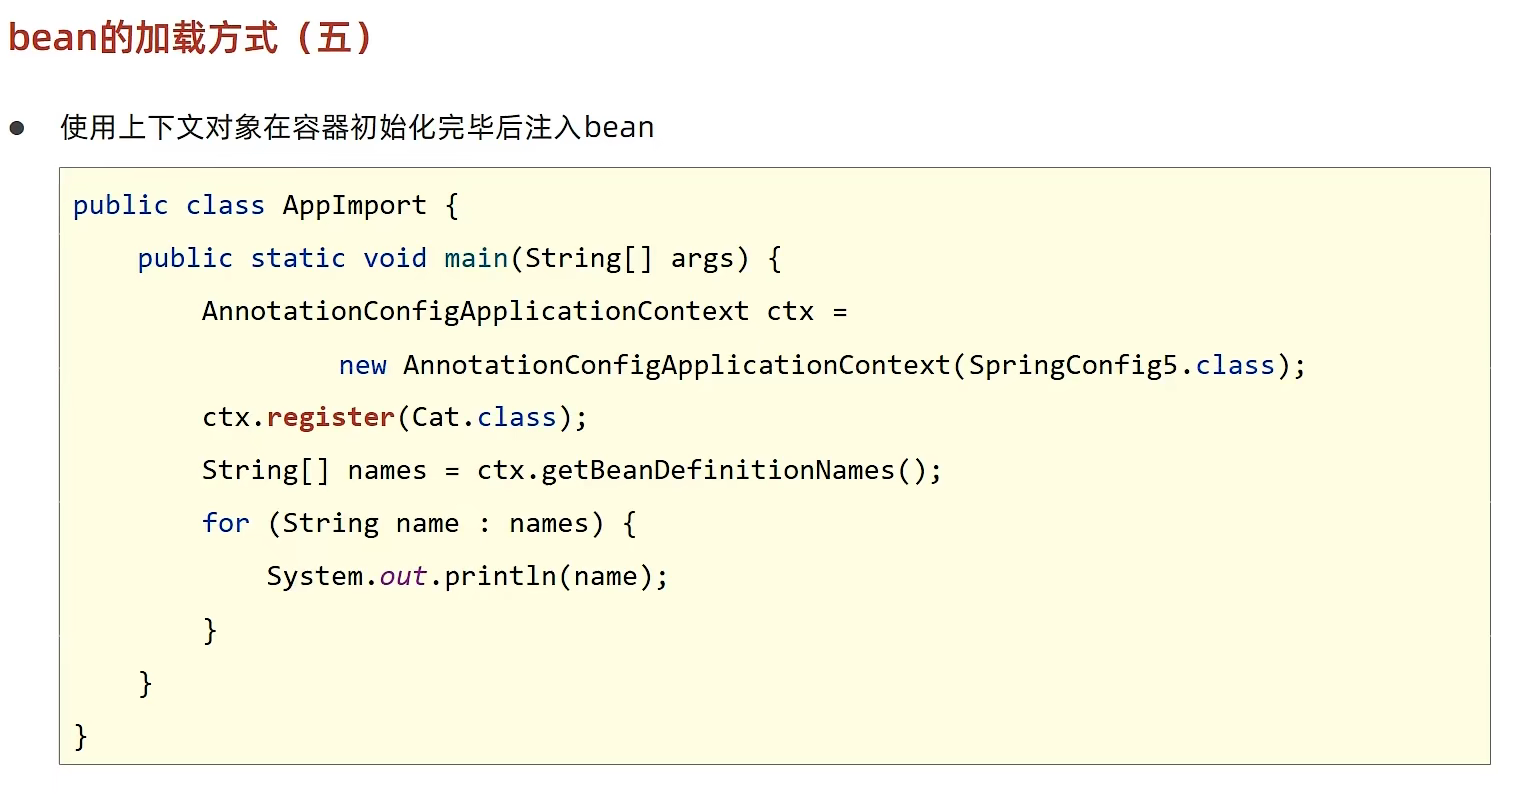
5.在spring上下文中加载bean
- 仅仅能在spring配置类中使用,使用xml配置的不可以使用
6.导入实现
ImportSelector(选择器)接口的类,实现对导入源的编程式处理- 可以使用
AnnotationMetadata根据各式各样的条件判断元数据,来选择加载哪个bean————高端 - 返回类名加载bean——low
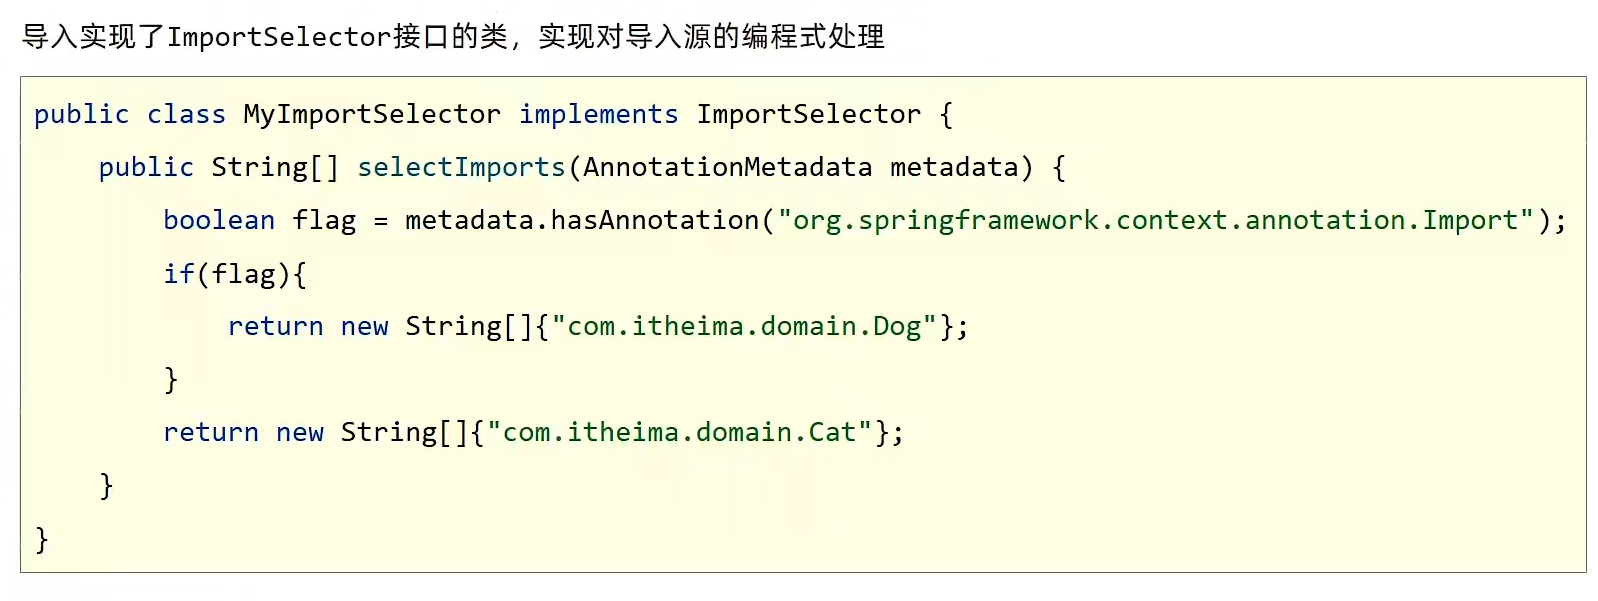
- 可以使用
7.导入实现
@ImportBeanDefinitionRegistrar接口的类- 可以使用
AnnotationMetadata根据各式各样的条件判断元数据,来选择加载哪个bean————高端 - 还可以使用
BeanDefinitionRegistry去注册bean——高端
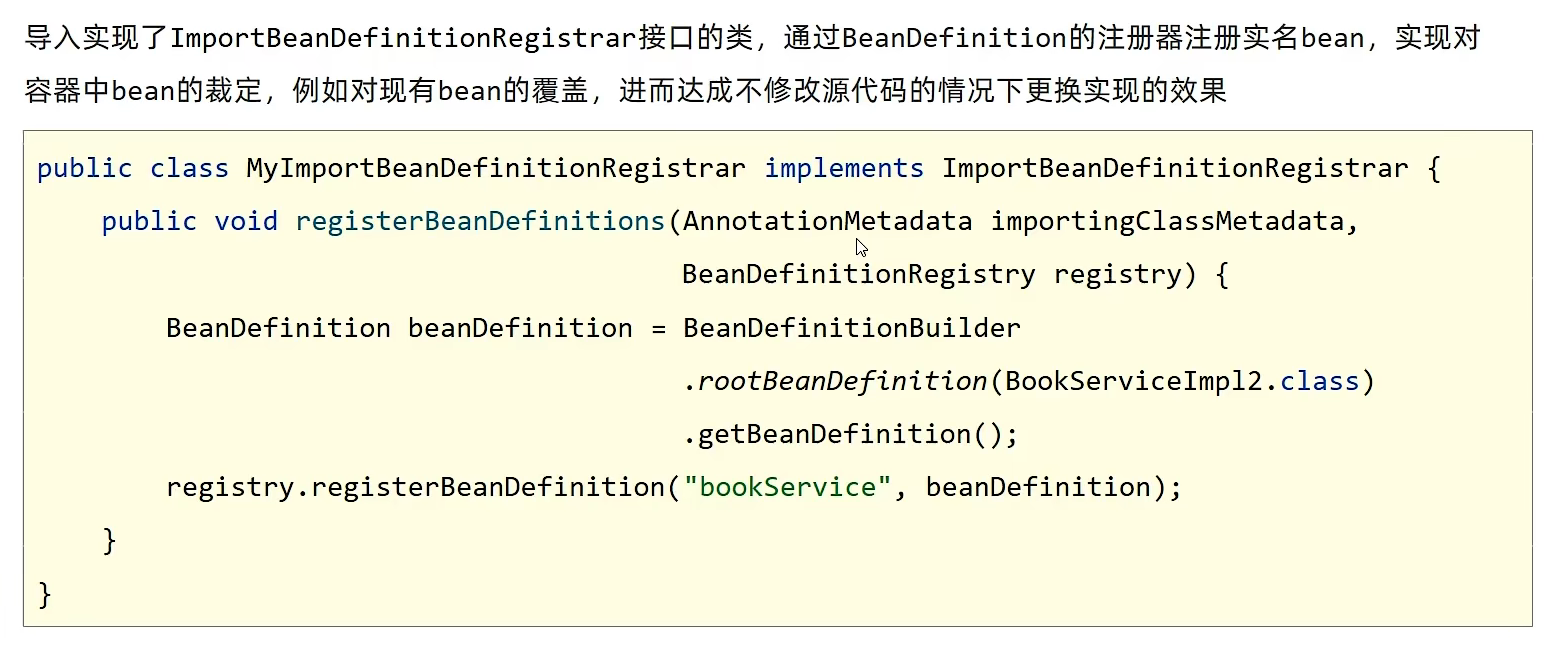
- 可以使用
8.导入实现
@BeanDefinitionRegistryPostProcessor接口的类- 加载优先级最高,可以作为最终裁定
- 可以使用
BeanDefinitionRegistry去注册bean——高端
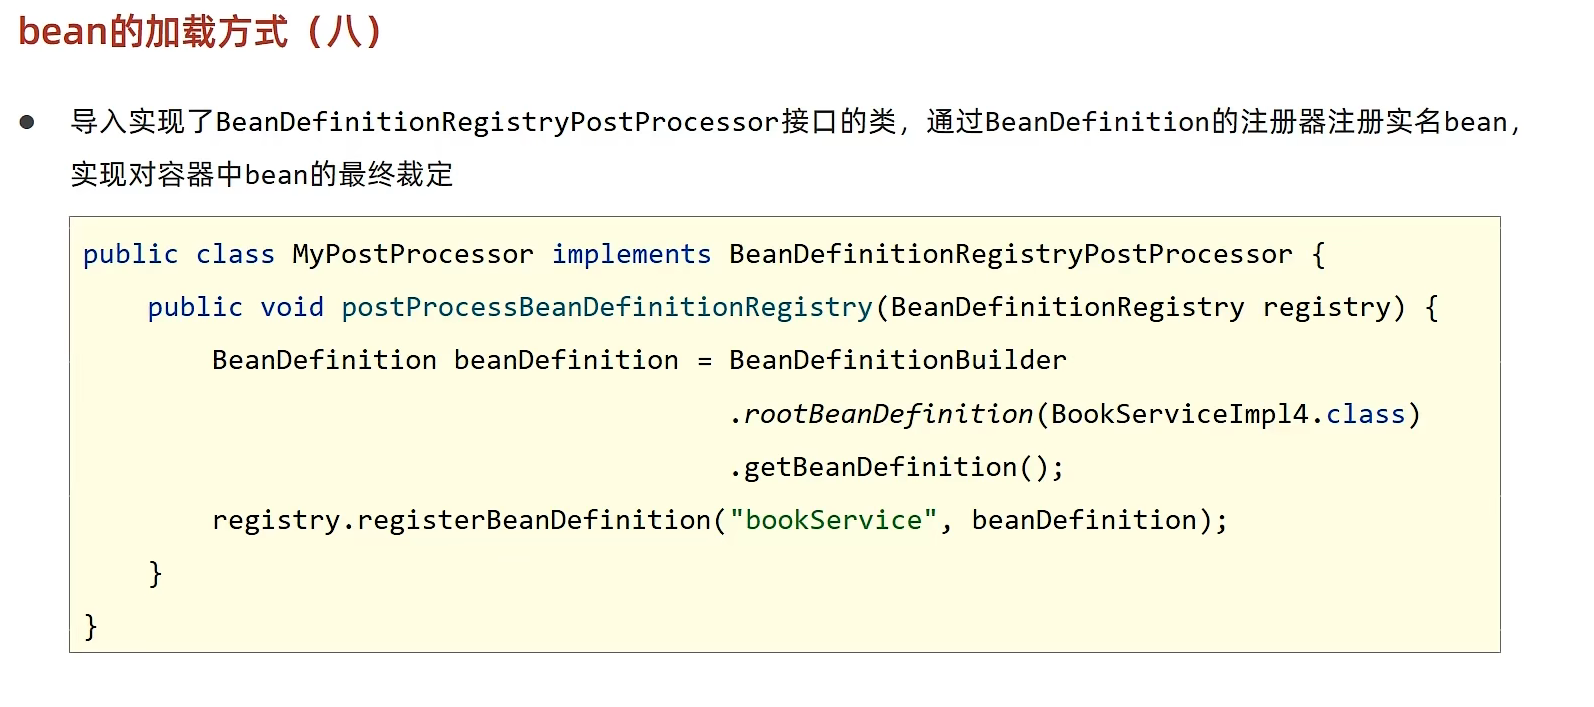
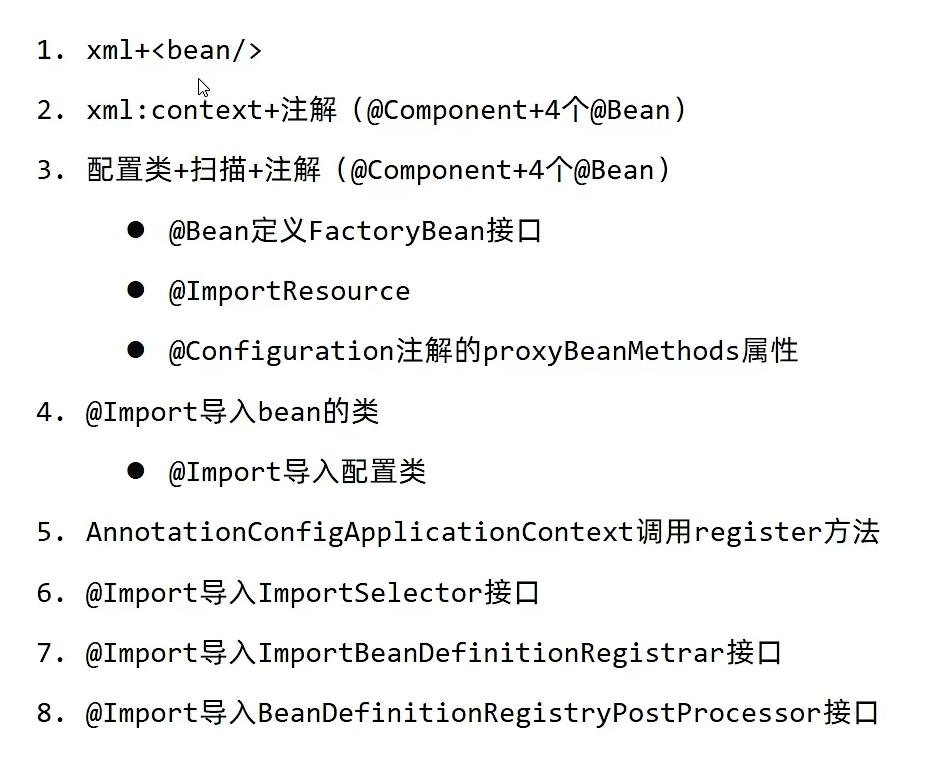
8种方式总结
# bean加载控制
5.6.7.8 都可以进行对bean加载进行控制(5,7,8——注册方式)(6——返回类名)
- 使用if-else的判断形式
public class MyImportSelector implements ImportSelector {

    public String[] selectImports(AnnotationMetadata annotationMetadata) {

        try {
            //读取环境中的类名
            Class<?> aClass = Class.forName("com.diana.bean.Mouse");
            //做判断
            if(aClass!=null){//如果存在老鼠类,则返回猫类
                //返回实体类
                return new String[]{"com.diana.bean.Cat"};
            }
        } catch (ClassNotFoundException e) {
            //出异常返回狗类
            return new String[]{"com.diana.bean.Dog"};
        }

//        return new String[]{"com.diana.bean.Dog"};
        return null;

    }
}
使用
Spring-Boot提供的注解@ConditionalOn...,来进行条件判断——springboot- 如果有容器中有mouse这个bean,且没有dog这个bean,就加载我的cat-tom
@Component("tom") @ConditionalOnBean(name="jerry")//如果有mouse这个bean,按bean名称匹配 @ConditionalOnMissingBean(Dog.class)//如果没有狗这个bean,按字节码对象匹配,与上面组合使用 public class Cat { }- 如果环境中有数据库这个类——导入了这个jar包,那么就加载我的dataSource
@Bean
@ConditionalOnClass(name="com.mysql.jdbc.Driver")//如果有数据库这个类(加了pom坐标),我在加载数据源的类
public DruidDataSource dataSource(){
    return new DruidDataSource();
}
用途:
可以将所有的配置抽取出来,配置各种限制条件,当需要使用这个技术的时候,对应的依赖Bean就进行加载,不用的时候,就不加载Bean,程序丝毫感知不到。
# bean依赖属性配置
将原定义在类中与yml文件关联的配置抽取出来,单独做成一个配置类,用配置类读取信息
不要将类强制声明为spring管控的类—— 去掉@Component——使用@EnableConfigurationProperties
//1.将原定义在类中与yml文件关联的配置抽取出来,单独做成一个配置类
//2.不要将类强制声明为spring管控的类—— 去掉@Component——使用@EnableConfigurationProperties
//@Component
@Data
@ConfigurationProperties(prefix = "cartoon")
public class CartoonCatAndMouseProperties {
    private Cat cat;
    private Mouse mouse;
}
使用@EnableConfigurationProperties来替代配置类的@Component
在主启动类中 使用@Import来替代这个类中的@Component
通过三目运算符读取配置类中的属性,实现,有配置就用配置值,无配置就用默认值
//不要将类强制声明为spring管控的类—— 去掉@Component——使用@Import
//@Component
@Data
//@ConfigurationProperties(prefix = "cartoon")——抽取成配置类
//使用这个注解来替代上面那个,一是解了与配置文件的耦,二是配置类不需要强制声明称Bean
@EnableConfigurationProperties(CartoonCatAndMouseProperties.class)

public class CartoonCatAndMouse {
    private Cat cat;
    private Mouse mouse;
    private CartoonCatAndMouseProperties properties;


    //将配置类注入进来
    public CartoonCatAndMouse(CartoonCatAndMouseProperties properties){
        this.properties=properties;
        cat=new Cat();
        //有值吗? 有就用,没有就用默认
        cat.setAge(properties.getCat()!=null && properties.getCat().getAge()!=null ? properties.getCat().getAge():1);
        cat.setName(properties.getCat()!=null && StringUtils.hasText(properties.getCat().getName())? properties.getCat().getName():"Tom");

        mouse=new Mouse();
        mouse.setAge(properties.getMouse()!=null && properties.getMouse().getAge()!=null ? properties.getMouse().getAge():2);
        mouse.setName(properties.getMouse()!=null && StringUtils.hasText(properties.getMouse().getName())? properties.getMouse().getName():"jerry");
    }

    public void play(){
        System.out.println(cat.getAge()+"岁的"+cat.getName()+"和"+mouse.getAge()+"岁的"+mouse.getName()+"打起来了");
    }

}
# 自动配置原理
- 自动配置原理
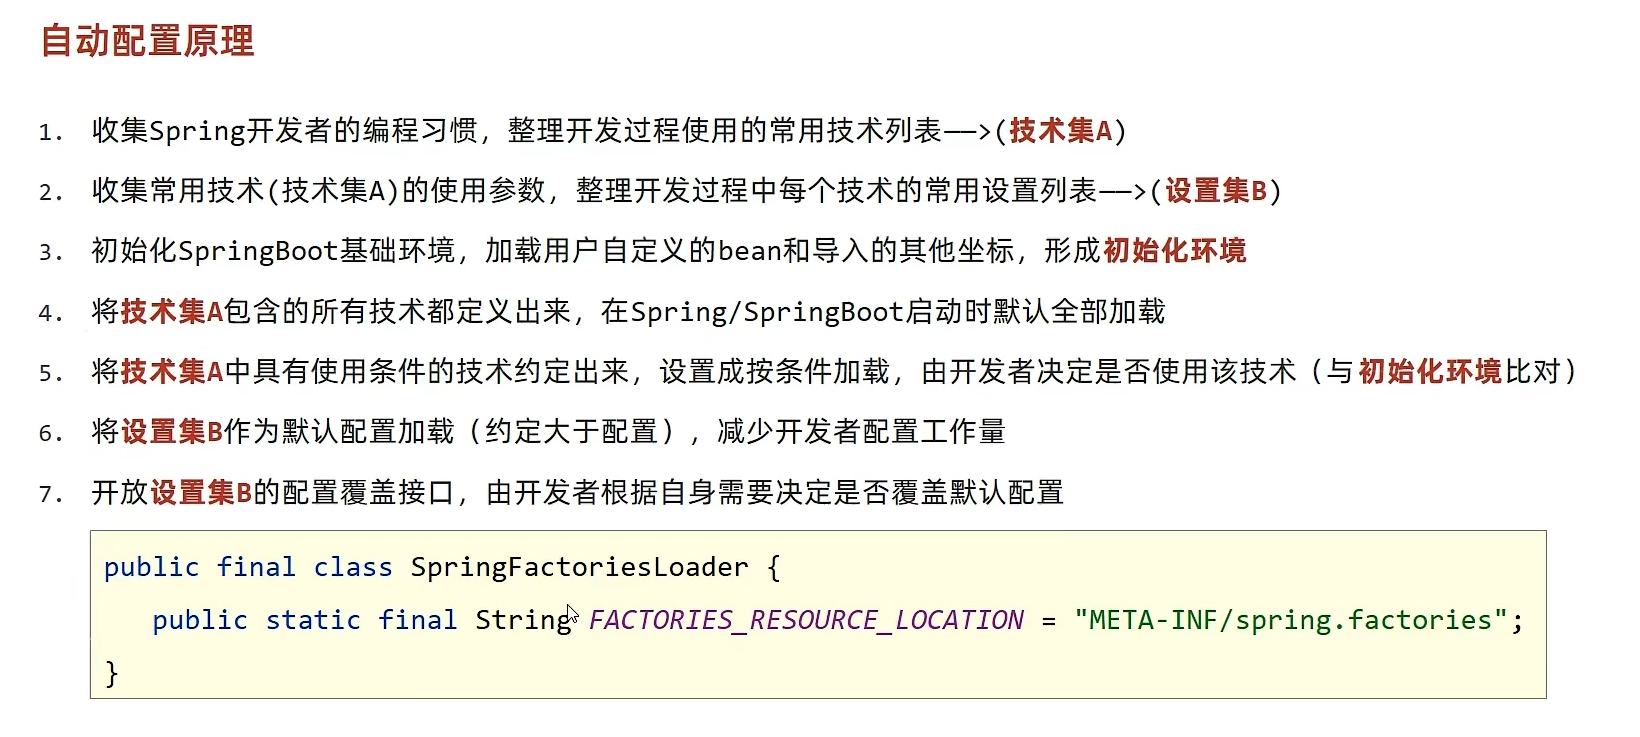
技术集A定义位置, 26-156,共130个
org.springframework.boot.autoconfigure.EnableAutoConfiguration=\
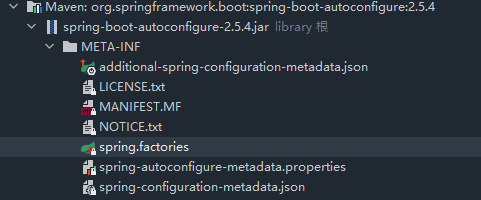
@ConditionalOn...设置条件判断,是否加载- 设置集B的某个类——读取配置文件的
.properties类,有很多属性,有的有默认值,有的没有。 - 在
.yml中配置对应属性,可以覆盖原先定义的值,如果不设置值,则按照默认值来。
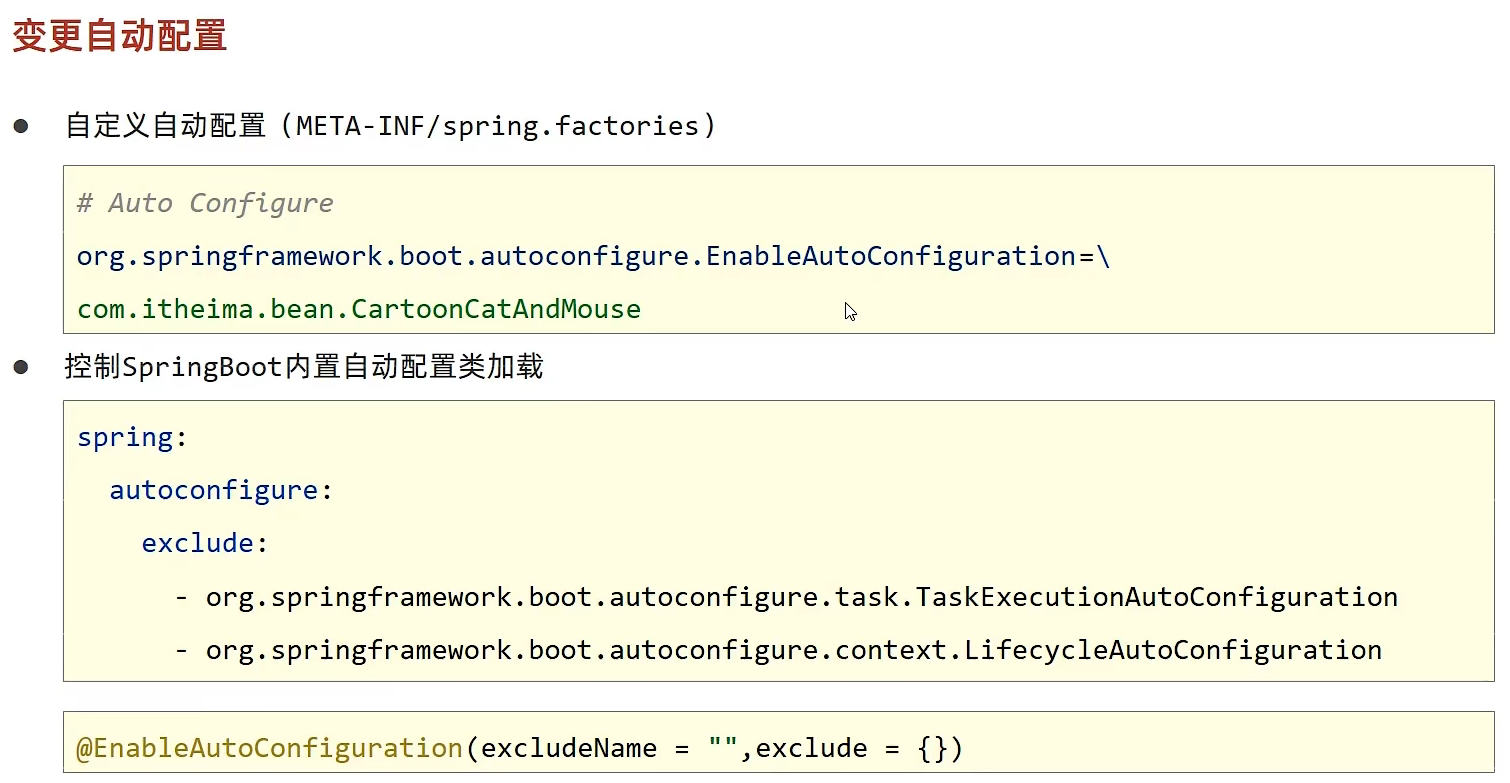
# 变更自动配置
- 自定义的自动配置类——抽取properties的类,在配置文件中进行配置即可
- 配置文件中也可以放入一些自定义的Bean,启动时会自动导入
- 不需要在类上加
//@Component - 也不需要使用
@Import(CartoonCatAndMouse.class) - 程序启动后,自动进入容器,可以和定义的Bean一样使用,自动注入等
- 不需要在类上加
# 自定义starter
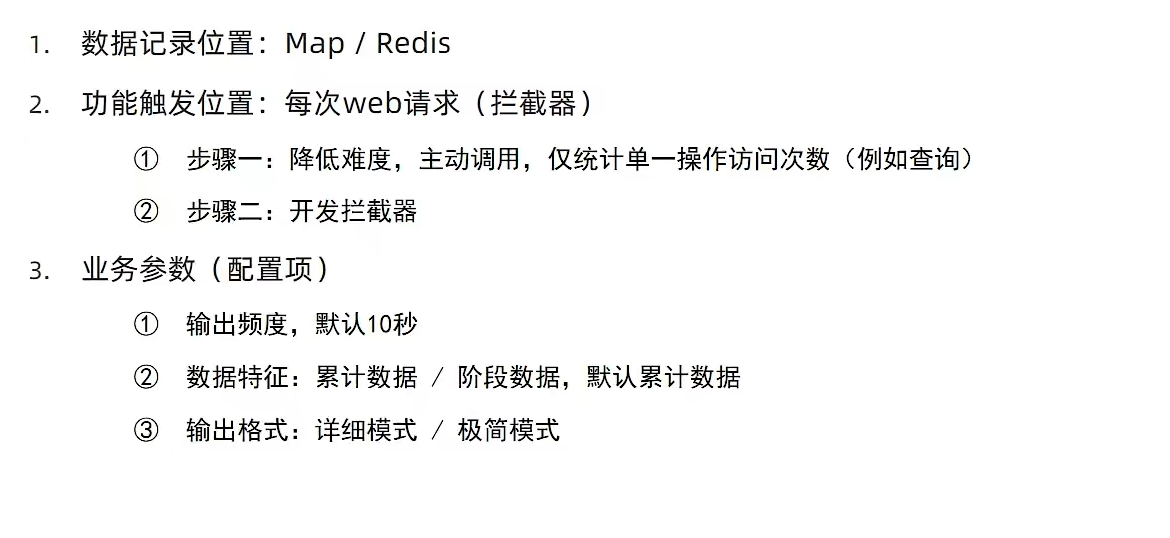
案例---统计独立IP访问次数
功能
- 每次进行访问网站行为均进行统计
- 后台每几秒输出一次监控信息(格式:IP+访问次数)
需求分析
自定义starter
开发一个业务功能——
IPCountService- 1.使用Map存储数据,一般来说会使用redis,这里进做演示使用
- 2.获取ip地址时,用到了
HttpServletRequest对象,但是自定义starter中没有这个对象,由调用starter的工程负责注入 - 3.使用el表达式获取属性值——
#{beanId.属性}@Scheduled(cron = "0/#{ipproperties.cycle} * * * * ?")//使用el表达式--/#{beanID.属性}
- 4.
String.format()用来格式化输出字符串
//统计ip访问次数
public class IPCountService {

    //定义存储Map
    HashMap<String,Integer> ipCountMap=new HashMap<>();

    @Autowired//当前的request对象的注入工作 由使用当前starter的工程提供自动装配
    HttpServletRequest httpServletRequest;

    @Autowired
    private IpProperties ipProperties;


    //每次调用当前操作,就记录当前访问ip,然后累加访问次数
    public void count(){
        //1.得到ip
        String ip=httpServletRequest.getRemoteAddr();
//        System.out.println("________________________________"+ip);
        //2.根据ip地址从Map取值,并递增
        Integer ipCount = ipCountMap.get(ip);
        if(ipCount==null){
            //如果是空,就放入1
            ipCountMap.put(ip,1);
        }else{
            //如果有ip,就自增一次
            ipCountMap.put(ip,ipCount+1);
        }
    }

    //展示map中的存储数据
//    @Scheduled(cron = "0/5 * * * * ?")//写死 5秒
    @Scheduled(cron = "0/#{ipproperties.cycle} * * * * ?")//使用el表达式--/#{beanID.属性}
    public void print(){
        System.out.println("IP访问监控");
        if(ipProperties.getModel().equals(IpProperties.LogModel.DETAIL.getValue())){
            //详细模式
            System.out.println("+-----ip-adress-----+--num--+");

            for (Map.Entry<String, Integer> entry : ipCountMap.entrySet()) {
                String key= entry.getKey();
                Integer value=entry.getValue();
                System.out.println(String.format("|%18s  |%5d  |",key,value));
            }
            System.out.println("+-------------------+-------+");
        }else if(ipProperties.getModel().equals(IpProperties.LogModel.SIMPLE.getValue())){
            //极简模式
            System.out.println("+-----ip-adress-----+");

            for (String key : ipCountMap.keySet()) {
                System.out.println(String.format("|%18s  |",key));
            }
            System.out.println("+-------------------+");
        }


        //如果设置为true 则情况数据
        if(ipProperties.getCycleRest()){
            ipCountMap.clear();
        }
    }
}
自定一个自启动类——导入功能类,配置类
- 理论来说,是要用标准方法,
@EnableConfigurationProperties(IpProperties.class)来进入配置类的,但是在定时器部分,需要读属性名称,需要用到beanId,所以要换成@Import的方法。 - 虽然不标准,但是可以解决实际问题。
//自启动类 @Import({IPCountService.class,IpProperties.class, SpringWebConfig.class})//导入功能类 @EnableScheduling //开启定时功能 //@EnableConfigurationProperties(IpProperties.class)//导入配置类 //理论上来说,上面这个方法是标准的,但是 影响了我的使用,所以我不能按照标准的来 //使用定义bean,再导入bean的方式 public class IpAutoConfig { }- 理论来说,是要用标准方法,
配置自启动文件——
spring.factories# Auto Configure org.springframework.boot.autoconfigure.EnableAutoConfiguration=\ com.liangbing.autoconfig.IpAutoConfig定义一个读取yml配置文件的配置类
- 1.对每个属性上面都要加注释说明,一个是方便自己和他人查阅,在就是Springboot可以读到文档,给出用户提示
- 2.定义了内部枚举类——如果有选择几类,最好用枚举的方式,更专业
- 3.使用
@Component("ipproperties")声明成了 一个bean,为了在业务层中调用el表达式,读取beanID的值
@Component("ipproperties")
//配置可设置的属性
@ConfigurationProperties(prefix = "tools.ip")
public class IpProperties {

    /**
     * 日志显示周期
     * 即每几秒刷新一次显示
     */
    private Long cycle=5L;

    /**
     * 是否周期内重置数据
     */
    private Boolean cycleRest=false;


    /**
     * 日志输出格式
     *  detail 详细模式
     *  simple 极简模式
     */
    private String model=LogModel.DETAIL.value;


    public Long getCycle() {
        return cycle;
    }

    public void setCycle(Long cycle) {
        this.cycle = cycle;
    }

    public Boolean getCycleRest() {
        return cycleRest;
    }

    public void setCycleRest(Boolean cycleRest) {
        this.cycleRest = cycleRest;
    }

    public String getModel() {
        return model;
    }

    public void setModel(String model) {
        this.model = model;
    }

    //定义内部枚举类
    public enum LogModel{

        SIMPLE("simple"),
        DETAIL("detail");

        private String value;
        LogModel(String value){
            this.value=value;
        }
        public String getValue(){
            return value;
        }
    }
}
配置拦截器和springmvc配置
要将网络层的东西也在starter中做好,这样用户只需导入starter,不需要动原来的代码,即可实现功能,方便用户。
在springmvc配置中,导入拦截器配置类很关键,没有这句话,无法注入拦截器
//拦截器 配置
public class ProjectInterceptor implements HandlerInterceptor {

    @Autowired
    private IPCountService ipCountService;

    //在目标方法执行之前  执行   可以用来进行数据校验,权限判断 等
    public boolean preHandle(HttpServletRequest request, HttpServletResponse response, Object handler) throws Exception {
        ipCountService.count();//调用自定义starter方法
        return true;
    }
}
//SpringWeb 配置 @Import(ProjectInterceptor.class)//这一个特别重要,没有这个外部调用,无法注入projectInterceptor public class SpringWebConfig implements WebMvcConfigurer { @Autowired public ProjectInterceptor projectInterceptor; @Override public void addInterceptors(InterceptorRegistry registry) { //添加拦截器,并拦截所有请求 registry.addInterceptor(projectInterceptor).addPathPatterns("/**"); } }开启yml提示功能
导入坐标——它的唯一作用就是生成配置文件,生成后去掉即可,对外发布,不要带着这个坐标
<dependency>
    <groupId>org.springframework.boot</groupId>
    <artifactId>spring-boot-configuration-processor</artifactId>
</dependency>
配置json文件——
spring-configuration-metada.json- 需要自己配置的是
hints- 里面是给出选择提示
{ "groups": [ { "name": "tools.ip", "type": "com.liangbing.properties.IpProperties", "sourceType": "com.liangbing.properties.IpProperties" } ], "properties": [ { "name": "tools.ip.cycle", "type": "java.lang.Long", "description": "日志显示周期 即每几秒刷新一次显示", "sourceType": "com.liangbing.properties.IpProperties", "defaultValue": 5 }, { "name": "tools.ip.cycle-rest", "type": "java.lang.Boolean", "description": "是否周期内重置数据", "sourceType": "com.liangbing.properties.IpProperties", "defaultValue": false }, { "name": "tools.ip.model", "type": "java.lang.String", "description": "日志输出格式 detail 详细模式 simple 极简模式", "sourceType": "com.liangbing.properties.IpProperties" } ], "hints": [ { "name": "tools.ip.model", "values": [ { "value": "detail", "description": "详细模式." }, { "value": "simple", "description": "简单模式." } ] } ] }- 需要自己配置的是
clean清除,install安装到本地仓库
工程导入对应的pom坐标,即可实现业务功能
# 核心原理
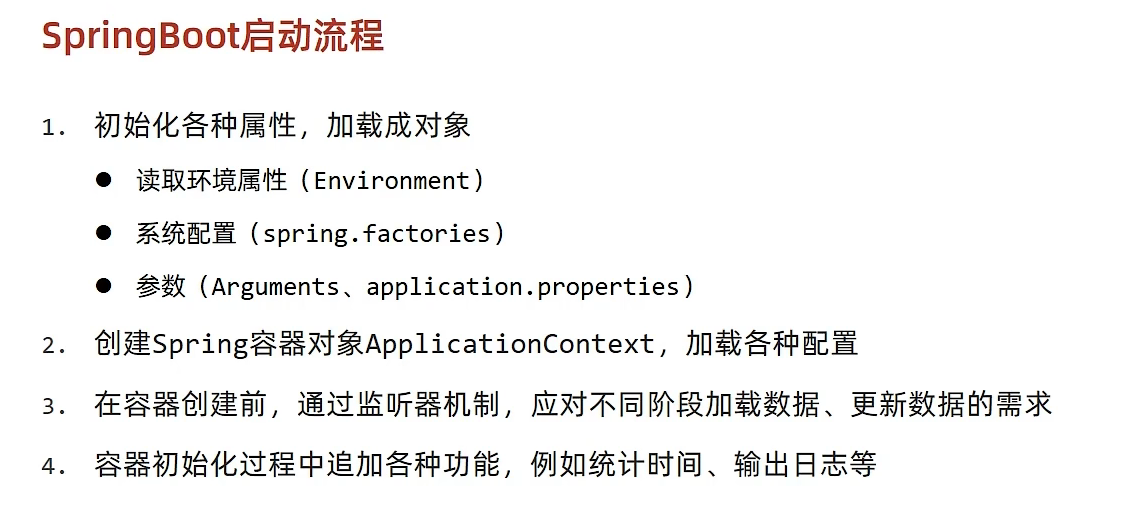
# SpringBoot启动流程
# 容器类型选择
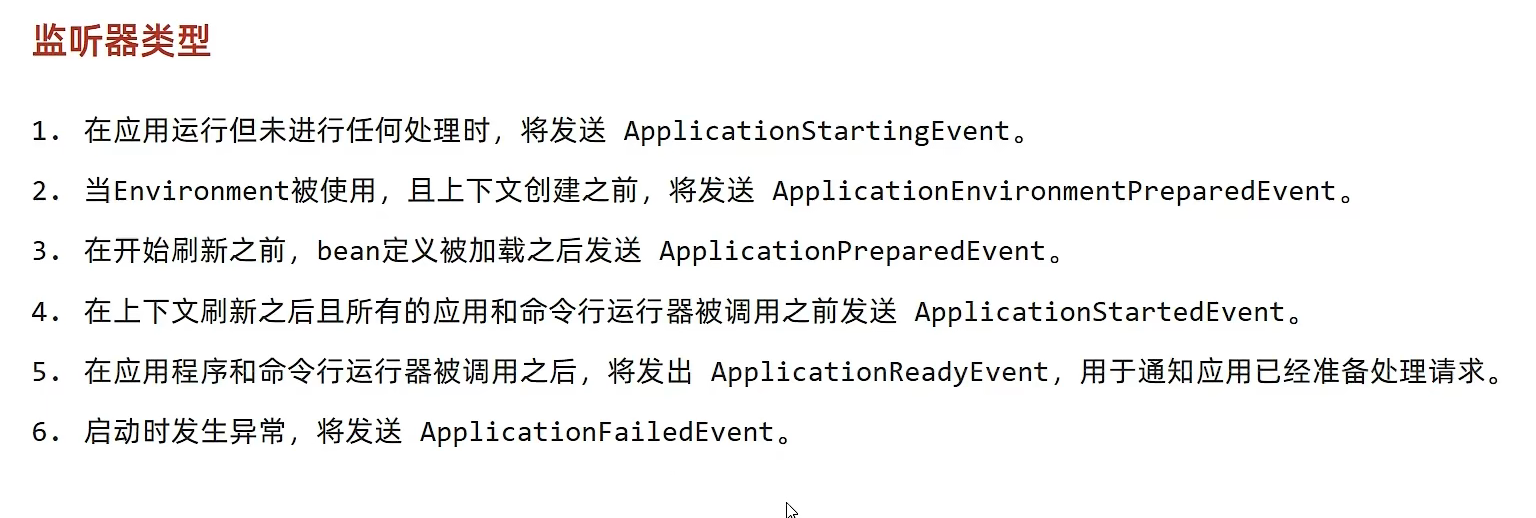
# 监听器